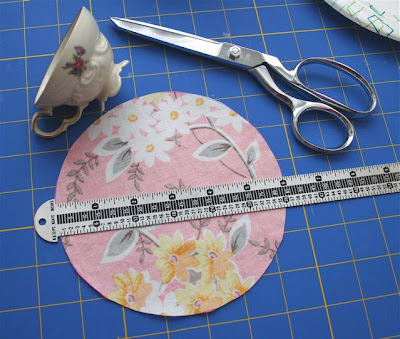
I've had these tiny vintage teacups for a couple of years, thinking I'd make candles out of them. Today, I decided to make one into a pincushion for my lovely mom.
 If you'd like to make one, here's what you'll need.
a small teacup (mine is not the usual sized teacup -- of course, if your teacup is regular sized, you can size up your pincushion to match)
poly stuffing
a 6 inch circle of coordinating cotton midweight fabric
needle
thread
hot glue gun
rubber gloves, if you are hot glue challenged and thrice burned, like me
 Thread your needle, no knot, and sew a big running stitch all around the wrong side perimeter of the circle of fabric. Leave a long tail so you don't pull your thread through. I sewed about a quarter inch from the edge. If you know how to make yo yos, this is just like that, without the extra fold.
 Gather your circle of fabric into a little pouch, leaving a small hole to stuff through, and tie off the ends securely.
 Stuff, and stuff, and stuff until it's nice and compact and smooth. Using small pieces of stuffing rather than large blobs will make this look nicer. Squash it around to make it look even. (you could embellish the pincushion more at this stage than I did -- add a fabric button on the top, for instance, or some ribbon criss crossing)
Apply liberal amounts of hot glue in the bottom and sides of your cup, taking care not to come too close to the top. Squash your pincushion down firmly into the glue. This is where you might need gloves -- the glue makes the cup HOT.
Done. Put some coordinating pins in it and wrap it up for your sewing friend. Or keep it for yourself!

This is adorable! Very pretty!
ReplyDeleteTammy
Just wonderful :) Thanks for the tutorial!
ReplyDeleteLove your blog!
Have a soggy evening from Auburn, WA :)
I've been wanting to make one of these for a while now, and your tutorial has now given me that extra confidence. Thankyou!!
ReplyDeleteOh wow... so easy yet so effective looking... my favourite sort of craft!
ReplyDeleteThank you for this tute, I'm definately going to be making one!
I have been SEARCHING for the perfect pincushion! Now I can make my own!! THANK YOU!
ReplyDeleteI have been using one for about two years. Additionally, I glued the matching saucer to the bottom of the teacup. Now I have a place to put small scissors, a spool of thread or bobbins. Now you don't have to worry about finding a use for the matching saucer!
ReplyDeleteBarbaraLyn
BarbaraLyn, what an excellent idea.
ReplyDeletehere is a link to my blog about this project!
ReplyDeletehttp://myweddingonamajorbudget.blogspot.com/2010/04/tea-cup-ring-pillow.html
Hey there,
ReplyDeleteSilia has added their version of your project on crafty community Cut Out + Keep and we thought you might like to see how it turned out.
You can see their version and also import your project here (that way you'll find out when any new versions are added) :
http://www.cutoutandkeep.net/projects/stubs/tea-cup-pin-cushion
Thanks,
Crafterella :)
I love these so much! I made one and added it to the Flickr pool. :) I'm giving it away for my June follower giveaway.
ReplyDeleteThanks so much for the tutorial!
Lovely project, I linked to your post here: http://homesteadblogger.com/hsbfrontporch/159325/
ReplyDeleteThanks so much!
Blessings,
Catherine :)
good idea!
ReplyDeleteThanks for the tutorial. And here is mine: http://nobaddays.wordpress.com/2010/08/20/easy-coffee-cup-pincushion/
ReplyDeleteGreat little tutorial! I love it and have whipped one up today but am yet to glue it in place. I hope I have copied your link in successfully http://theminett.blogspot.com/ I think everyone should make one for their sewing table!
ReplyDeleteSoooo cute!! I made this and it turned out so cute and it's so easy to make. Thanks for posting it!!
ReplyDeleteThis is so pretty and will make ideal gifts for crafty friends & family. Thanks for sharing.
ReplyDeleteHave been wanting to try this for a while, and now I have. Thanks so much for the idea. I blogged about it here:
ReplyDeletehttp://candykins-crafts.blogspot.com.au/2012/03/vintage-teacup-pincushion.html
You are a part of my inspiration page
ReplyDeletehttp://trixih.blogspot.com/p/my-inspiration.html
Hi, I'm a new GFC friend. I would love it if you would stop by and be mine, too.
ReplyDeleteThanks for the tute, it helped with the one I just did.
Thank you so much for sharing this, I have needed a pincushion for ages and keep putting off buying one ~ and added bonus is I collect teacups ~ what a great way to use one of my favorites!!!
ReplyDeleteOther then this being absolutely adorable. I can use this to put my pens in right? Wait that's why its called a teacup pincushion. It seems I've answered my own question.
ReplyDelete-Zane of ontario honey
Hiya . I have made a couple of these tea cups pincushion and I allso glud the cup to the bottom and it's handy for changing bobbins put the spare one on to it saves it from rolling of the table.
ReplyDeleteMargaret, what a clever idea! I love finding the matching saucer but sometimes it's missing.
Delete